
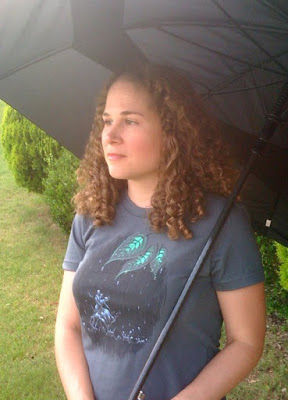
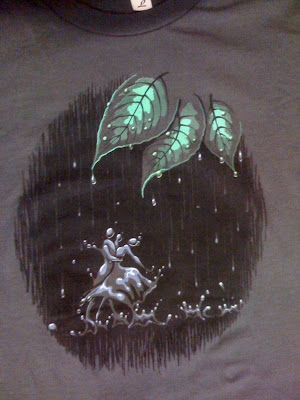
 Yesterday I had no idea what to blog about but by this afternoon two subjects were bestowed upon me. The first that I will discuss came to me by mail: My Rain Dance shirt! Now anyone that knows me knows I'm usually very nervous and critical of how my designs actually print. I'm ecstatic to say I have no anxiety or complaints about this one. I'm especially happy about the dark gray background in the design. I know the safest color to choose would have been black since the asphalt shirt is already so dark, but I just didn't want it to look too heavy. I took a risk in picking out a dark gray pantone. I'm not sure if they used the exact one I gave them, but the color that printed looks even better than I imagined, so thanks Woot! :)
If you like it, be sure to snag one while you can. It's hard to say how long it will be for sale.
The next order of business is halftones. I've read a lot of posts on forums and such with inquiries about the best way to execute them. I figured I'd go ahead and share how I do mine. I can't remember exactly where I went to learn them, but I know it was a tutorial online somewhere, so I don't take full credit for this technique.
Let's say you have a design something like this: (I use Photoshop CS.)

Make sure each color is in a different layer. The layer we want to convert to a halftone would be that glowy gradient behind the flame. Currently, it's a gradient from orange to black.
1. Create a new file the same size in CMYK. Drag the gradient layer into it. Change the colors to go from black to white. It should look like this:

2. Flatten image.
3. Change image mode to Grayscale
4. Change image mode to Bitmap. This will bring up a dialog. Make sure the resolution output is 300, and use the Halftone Screen method.
5. Choose Frequency, Angle, and Shape. You may need to play around with this according to how you want it to look. The higher the frequency, the smaller the detail and more difficult it is to print. I usually don't go higher than around 40. I'm not sure if there is a defined limit. If anyone knows this please feel free to comment because I've often wondered.

For this example I chose a frequency of 15, angle of 90 degrees, and the round shape. It should look like this:

6. Change Image Mode back to Grayscale.
7. Change Image Mode back to CMYK.
8. Unlock the background layer into a regular layer by double clicking it.
9. Using the Select menu, select color range of Shadows.
10. Select Inverse.
11. Delete.
12. Make a Color Overlay of the original orange. It should now look something like this:

13. Drag this into your original file. Now the layer is in one color and is now printable.

I hope this was helpful. There might be an easier way so please let me know if you are aware of it. Thanks for reading! If you have a chance, please check out all my active designs on the left side of the page before you go. :)


3 comments:
Handy...I never knew how to create a proper halftone. Definitely will return to follow all the steps when I'm ready to try it. :)
You are an inspiration. Great and simple tutorial. There is no set parameters for how small you can take your halftone. It all depends on your printer.
Thank you so much! You are a lifesaver.
Post a Comment